top of page
Writer's pictureBridget Ferrell

Make a fun visual Behavior Clip Chart for your Kindergarten classroom!

Kindergarten Behavior Clip Chart

The behavior chart in this picture is something I created several years ago and use in my Kindergarten classroom alongside "supplementary paper charts" which I keep in students' daily take home folders (more info coming on those soon!). The idea is to have a quick way for students to check in with their current level of behavior in an easy, straightforward, and visual manner. Each day, each student starts on the "Ready to Learn" tag. As the day progresses, students may need to move their clip as their behavior changes (good or not so good). Of course, every student always has the opportunity to make it back to "Ready to Learn" and the "Super Star" tags! If a student ends the day with anything different than ready to learn, it is checked off on their daily take-home "supplementary paper chart" so that parents have a good idea of how their child behaved at school. These paper charts are a great way to track a student's behavior and see if there are any trends. This chart may not be the best tool for extreme behaviors, but it is a way to hold most students accountable. And, since students have the daily opportunity to move their clip to "Super Star" based on amazing and helpful behavior, this chart becomes a huge source of motivation! Students LOVE to move their clip to "Super Star," and the fact that they can show their parents with the paper chart makes this achievement even more meaningful!


I chose real photos for the tags for each level of behavior, which consists of: Super Star, Ready to Learn, Think About It, and Need a Break! Each student has their own clothespin, and they are in charge of moving their own clip when asked to do so. I understand that having a visual classroom chart may not be right for every (primary) school teacher, but for me it has been a great way to emphasize appropriate student behavior in the classroom. As a side note, I got this idea from a teacher that I worked with many years ago. Instead of animal photos, she used a bad banana system! So that may also be something you could try in your classroom!

35 views0 comments
Writer's pictureBridget Ferrell

Creating teacher resources from home is a simple process!

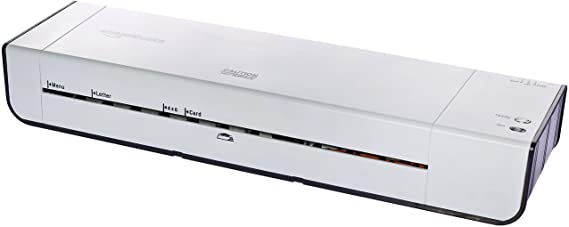
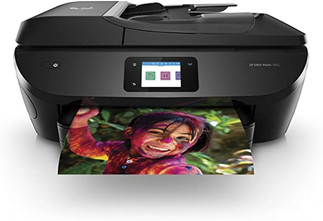
I'm not going to deny that if you have access to a large school printer, laminator, and paper cutter that your projects won't be easier - because they will - but a personal printer, laminator, and paper cutter are great tools for home projects! I currently use the HP Envy Photo 7855 All in One Photo Printer (as seen in the picture) alongside the HP Instant Ink Subscription Service."Instead of paying to buy a new cartridge, you pay a monthly amount to be allowed to print a certain amount of pages." HP Instant Ink is alerted when you need new cartridges and sends them automatically. At first, I didn't like to make monthly payments for printer ink, but when I realized it was so much more cost effective and easier than having to buy ink, I became a believer! I also use the Amazon Basics 12-inch Thermal Laminator Machine (as seen in the picture). You can choose to order the Amazon Basics Clear Thermal Laminating Plastic Paper Sheets alongside the laminating machine. These sheets are stronger and much more durable than school laminating sheets. Now, if you are laminating from home, you'll most likely also need a paper cutter to help with your projects. I love the Swingline Paper Trimmer, Guillotine Paper Cutter (as seen in the picture) from Amazon! It has been reliable and very handy, especially for cutting and trimming laminated photos and card-stock. I love that is has a wooden base, a metal arm, and steel blade.


Using a personal printer, laminator, and paper cutter means that your projects take longer, since you obviously can't create in bulk, but the products turn out very sturdy and more professional looking. I use them to create ALL of my (Photo) Picture Cards that I sell on TPT!


12 views0 comments
Writer's pictureBridget Ferrell

Use a Ask 3 Before Me Crown so that students do not interrupt individual or small (reading) group instruction!

As you can see I made my crown from art supplies I had in the classroom, but of course you can find any type of crown or hat that works for you! I typically introduce the Ask 3 Before Me Crown when I commence individual or small (reading) group instruction - usually around week 6 of the Kindergarten school year. As we all know or can imagine, teaching in Kindergarten means being a constant source of (needing your) attention! The crown signifies that students cannot interrupt you. The general rule of thumb is that if they have a problem, they can ask 3 other students for help first, before attempting to interrupt you....unless "they or someone else is bleeding, vomiting, hurt, or passed out" as I like to say! :)


Typically, I only use the crown for those moments of the day when I truly want to have the time to personally connect with my students, such as during individual or small group instruction or assessment. These are sacred times in the classroom and it is only logical to strive for flow and continuity without distraction (if possible). Every student deserves this special time with you and your uninterrupted focus and attention.


While I provide the individual or small group instruction, the other students have the opportunity to engage with the learning centers. I am very purposeful about "center time." It is not simply for the sake of busy work. I arrange and display learning centers in an engaging and thoughtful manner, so that it truly is a learning experience for students. Check out my website for Learning Center designs, details, and activities, including: reading center, writing center, math center, and science center.


23 views0 comments
bottom of page